Disclaimer: As an Amazon Associate I earn from qualifying purchases. Therefore, we may collect a share of sales from the links on this page, at no extra cost to you!

Interested in building a DIY leopard gecko playpen?
If so, we have the perfect guide for you!
Having a leopard gecko playpen will allow your reptile a space to have fun, climb around, and explore!
Consequently, it’s a great form of exercise and enrichment for your leopard gecko!
Needless to say, a healthy leopard gecko is a happy leopard gecko!
So, let’s get to business! Here’s how to build a leopard gecko playpen in 5 easy steps!
Materials Needed:
Estimated time to build: 20-30 minutes
Jump to..
Don’t want to build a playpen? Check out these great alternatives:
Purpose of Each Material
So, before diving into our playpen guide, let’s dive a little deeper into the purpose of each of the required materials.
Needless to say, the cardboard will serve as the walls of your playpen.
Of source, you don’t HAVE to use cardboard. I simply had a lot of old boxes lying around that were serving no purpose.
Although this guide will assume you’re using cardboard (like myself) – you can use any material you’d like to create the walls of your playpen.
Just make sure that it’s solid and sturdy so your leopard gecko will be unable to escape!
Furthermore, I don’t recommend using anything too heavy. If an accident happens and one of your walls collapses, it could fall and injure your leopard gecko.
Cardboard, however, is essentially weightless. If it falls atop your leopard gecko, no harm will be done! Just make sure your boxes are the dimensions so your playpen will be equal height throughout.
Of course, the scissors will be used to cut the cardboard.
Additionally, the PMMA tape will be used to connect the walls of your playpen.
I suggest avoiding standard duct tape as it is toxic and its adhesive strength is very poor – especially on cardboard.
Furthermore, duct tape contains dangerous chemicals and can create a keratolytic environment which can lead to illness in your leopard gecko.
On the other hand, PMMA tape is perfectly safe for your reptile and its adhesive is much more compatible with cardboard. This means your leopard gecko playpen will last much longer! Another plus is it’s 100% waterproof.
Leopard Gecko Playpen - Step by Step Tutorial
Now that you know what materials are needed to create your leopard geckos playpen, let’s start building!
Step 1: Gather Your Materials
Start by gathering your materials. You should have a heavy duty pair of scissors, PMMA tape, and some large cardboard boxes.
Also, it should be noted that you will need at least two large boxes for this to work.
However, we recommend using three boxes. This will make for a pretty large playpen for your leopard gecko.
Needless to say, the more boxes you use, the bigger your leopard geckos’ playpen will be.
However, the size of your playpen is completely up to you. Although, we recommend making it around twice the size of your leopard geckos enclosure.
This will give your leopard gecko plenty of space to have fun and explore!
So.. Back to business. Let’s get to cutting.
Step 2: Start Cutting Your Boxes
Don’t cut the entirety of the box – simply cut off the flaps off of the top and bottom of each box.
Furthermore, you need to cut one edge (horizontally) of each box so you’re able to open up the box.
You will then be left with one large, solid piece of cardboard that has three creases.
You will also be left with the flaps that you cut off originally.
Naturally, the larger piece of cardboard will serve as the walls of your playpen.
The smaller pieces (the flaps) can be taped together and used as accessories such as hides and climbing accessories.
However, this is not necessary. You can put actual leopard gecko hides in your playpen if you prefer.
But, if you’re on a budget, simply use the flaps as hides and accessories.
Although, putting actual accessories such as artificial plants, rocks, and hides will give your leopard gecko a more naturalistic playpen.
Step 3: Begin Building The Walls
So, now that you have all your pieces cut out and ready to go, you will begin building the walls of your leopard geckos playpen.
By this point, you should have three large pieces of cardboard (assuming you started with three boxes) – each having three creases.
It’s pretty self-explanatory from here, but simply take the three large pieces of cardboard and start taping together the edges of each one.
Step 4: Shape Your Leopard Gecko Playpen
Once the cardboard pieces are taped together, you’ll shape them in the form of a box and tape the final edges together.
For my leopard geckos’ playpen, I used three boxes. As a result, it came out pretty large.
However, if you only used two boxes, your playpen will be quite a bit smaller. It will likely be a little larger than the size of your leopard geckos enclosure.
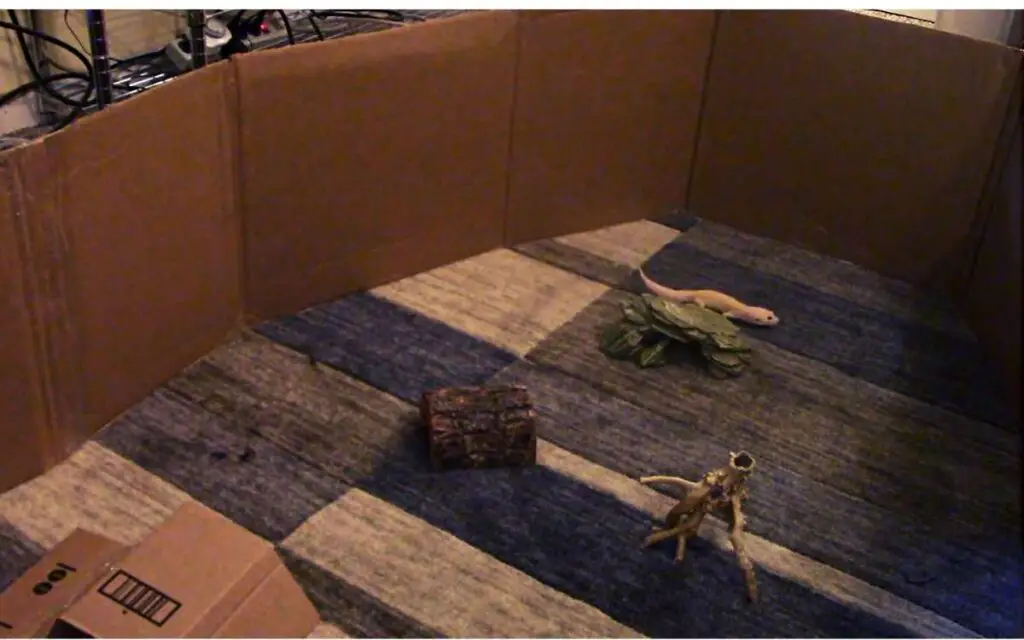
Step 5: Accessorize Your Playpen
Now that you have the walls of your leopard geckos’ playpen built, you’re almost done!
The only thing left to do is add toys & accessories!
Of course, you can get as creative as you’d like when it comes to decorating your playpen!
Wild leopard geckos love to explore, climb, and hide in caves and crevices.
Therefore, it’s best to try and replicate a natural atmosphere that a wild leopard gecko would experience!
This means adding lots of hides, climbing accessories, and fake plants.
Alternatively, as we mentioned earlier, you can use the flaps (that you cut off earlier) to create these hides and climbing accessories.
Again, you can get super creative with this – cutting and taping the small pieces of cardboard in any shapes you’d like.
Frequently Asked Questions
Here’s some frequently asked questions when it comes to building your leopard geckos’ playpen.
What Alternatives Can I Use To Cardboard?
If you don’t have cardboard boxes to create your playpen, you can use any material you’d like. Just make sure it’s escape-proof!
Some alternatives you can use include wood, plastic, and even stone. Of course, these materials may require extra tools and a little more time, but they can be used if you’d like!
How Tall Should My Leopard Geckos Playpen Be?
We recommend making your leopard gecko playpen at least 12 inches in height. This should be pretty easy to accomplish if you’re using large boxes.
Leopard geckos aren’t the greatest climbers and unlike other geckos, they don’t have sticky feet. Therefore, they can’t climb walls.
However, just to be on the safe side, it’s recommended to keep your playpen at least one foot in height. If your boxes are shorter than one foot, you may need to add a roof onto your playpen.
How Often Should I Put My Leopard Gecko in Its Playpen?
This is totally up to you. You can let them in their playpen every day or on a weekly basis.
However, it’s important to note that leopard geckos require heat. Hence, you should only allow your leopard gecko 1-2 hours in its playpen.
How Can I Tell If My Leopard Gecko Likes Its Playpen?
It’s usually pretty easy to determine whether or not your leopard gecko enjoys its playpen.
For instance, if they’re exploring, climbing, hiding, and taking advantage of the accessories you’ve placed inside, it’s a good sign they’re enjoying their playpen.
On the other hand, if they move to the corner and avoid the accessories – it may be a sign that they’re not enjoying themselves.
Furthermore, if they’re “glass surfing” (aka propped up against the walls of the walls of the playpen seemingly trying to escape) – they probably don’t enjoy their playpen.
However, it’s fairly normal for a leopard gecko to not enjoy its playpen during the first few uses.
Leopard geckos are creatures of familiarity. When they’re in a new environment, it can stress them out pretty easily.
Therefore, allow your leopard gecko time to get used to its playpen. It may take a few weeks for this to happen.
Additionally, it’s advised that you keep your accessories in the same location of your playpen. If you continuously move around the accessories, they will be less likely to become accustomed to their playpen.
How Do I Store My Leopard Geckos Playpen?
You can store your playpen by folding it and placing it in a closet or bedroom corner. You don’t have to leave it spread open 24/7.
Do I Need to Place A Heat Lamp or Heat Mat Inside of My Playpen?
No, you do not need to place any additional heating in your playpen.
Cardboard is flammable so it’s strongly advised to avoid heating your playpen.
Your leopard gecko will be perfectly fine without heat for a couple of hours while they’re inside their playpen.
What Should I Use as a Substrate?
The substrate I’ve found works best is a simple area rug. I personally use this one I found on Amazon because it fits the size of my playpen perfectly. It’s also inexpensive and easy to clean if your leopard gecko poops on it.
Can I Put My Playpen Outside?
Absolutely – putting your playpen outside will give your leopard gecko some natural sunlight while simultaneously keeping them at their preferred temperature levels.
Although, it’s important to note that grass and wild bugs can contain pesticides or parasites that may harm your leopard gecko.
Consequently, you should place a rug or some other form of substrate so they’re not in direct contact with the grass.
Benefits of Building a Leopard Gecko Playpen
There are many benefits to building your leopard gecko a playpen.
Some of these benefits include:
- Allowing your leopard gecko time outside its enclosure.
- Giving your leopard gecko new places to explore.
- Provides needed exercise for your leopard gecko.
- Provides an enriching and mentally stimulating experience for your leopard gecko.
- Can be a bonding experience for you and your leopard gecko.
- Best of all, your leopard gecko will have a blast!
Final Thoughts - Building a DIY Leopard Gecko Playpen!
Having a playpen for your leopard gecko can provide an array of benefits that will keep them happy and healthy!
Fortunately, with the help of this guide, you can build your playpen in just 30-minutes or less!
If you want to create a fun and enriching experience for your leopard gecko, building a playpen is the perfect solution!
Hopefully, you were able to benefit from this guide!
If you have any comments or questions, leave them down below!
Otherwise, as always – Happy Herping!